Published July 14, 2020 10:37AM
Bike repair basics: Maintain your rear shock
Overhaul the air can every 40 hours of ride time to ensure it is cleaned, lubed, and properly sealed and inflated.
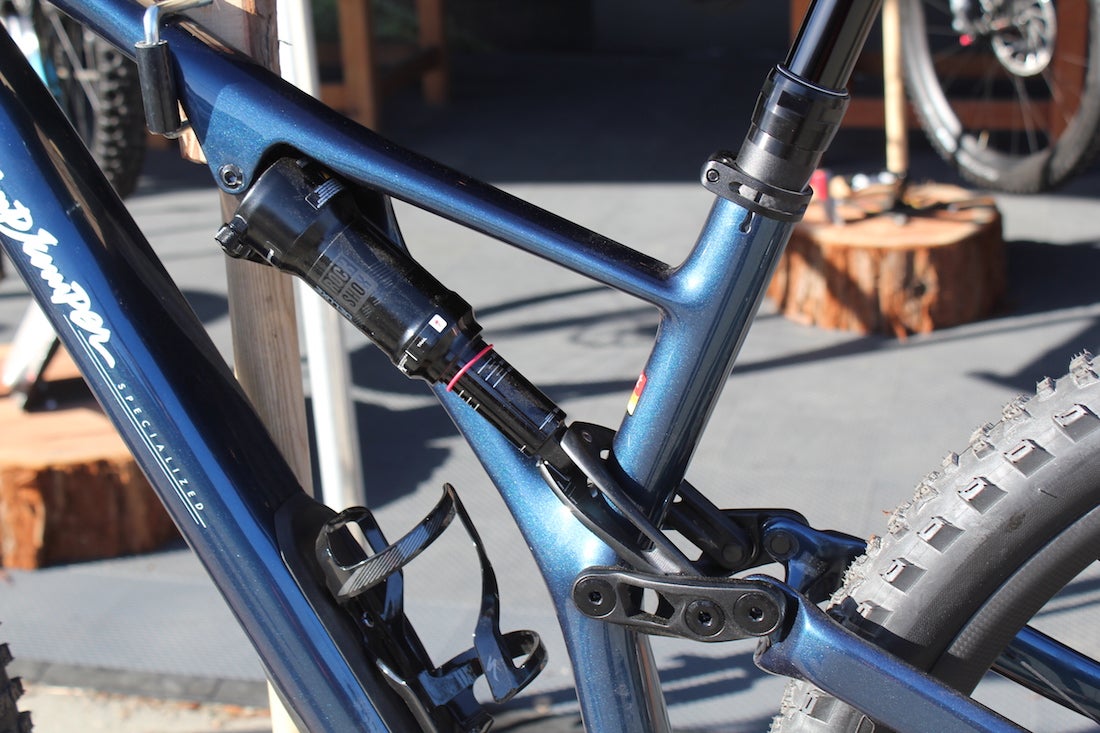
Specialized calls the new frame's shock junction area the Sidearm, due to its asymmetric shape. As you'd expect, this design is meant to be lighter and stiffer. Photo: Spencer Powlison
Mountain bikers should remove and lubricate the air can (or air sleeve) from an air shock after every 40 hours of riding unless the bike is typically ridden in very clean conditions. This may seem like a ridiculously frequent schedule of maintenance, but think about it for a second. You don’t think twice (or I hope you don’t) about changing the oil in your car’s engine every 3,000 miles, do you?
Well, 3,000 miles is 50 hours of driving at 60mph, and the engine has a lot of oil volume and an oil filter to keep pulling contaminants out of the oil as it circulates. Now consider your bicycle shock. Its piston is constantly going up and down as you ride, it has less than a teaspoon of lubricant in it, and it has no room for an oil filter. Forty hours does not seem so extreme in that context, does it? If you don’t do the air-can service yourself every 40 hours, have a qualified mechanic do it for you. Re-grease the eyelet bushings after every 40 hours of riding along with doing the air-can service.

Air-can overhaul
Because the air can should be serviced frequently, these instructions will show you how to overhaul it in a hotel room or parking lot, without a vise. And even a vise may not be enough to push the can on far enough to screw it back on anyway, so reassembling the air can this way, on the bike, may be a must in any case.
- Deflate the shock. Sit on the bike while depressing the Schrader valve pin with a blunt implement (hold a rag over it to keep oil from spurting on you) to release as much air as possible; do it slowly in case it has a negative air spring.

Unscrewing a Fox air can from the shaft eyelet while it’s on the bike. - While sitting on the bike, grasp the air can with your hands and unscrew it. Turn it counterclockwise, as if it were a lid on a jar. If you cannot get enough of a grip to twist the air can, wrap an inner tube around it first. Alternatively, after removing the shock as in step 3, you can clamp the faces of the shaft eyelet (the eyelet at the big end of the shock) between soft jaws or wood or aluminum blocks in a vise and unscrew the air can there.

DT Swiss air shock disassembled in vise for air-can service. - Remove the shock from the bike. This can be as simple as removing the two mounting bolts and pulling the shock off. But if the shock doesn’t pull out of its mounting tabs when you remove the bolts, there may be a hollow, threaded shaft through the eyelet that overlaps into the holes in the frame tabs. In this case, install one bolt a few threads and tap it inward with a hammer to knock the sleeve out of the near tab. Remove the bolt, and tap the sleeve the rest of the way out with a hex key or the like.
- Slide the air can off. If the mounting hardware in the body eyelet bushing is too wide to allow the can to slide off, you’ll need to remove it. Pull top-hat-shaped aluminum spacer/reducers out with pliers or a vise, or by twisting them out with an easy out (spiral-flute screw extractor) on a tap handle. Alternatively, if you have a long sleeve through the eyelet bushing with an aluminum spacer on either end, pull off the spacers and push out the sleeve with your fingers or a vise.
- Clean all seals and contact areas. With a clean, lint-free rag and isopropyl alcohol if need be, thoroughly clean the seals at the narrow end of the can, the seals around the piston, the inside of the can, the threads, and the O-ring that the can screws up against. Wipe down the piston shaft and the shock body as well.
- Inspect the seals and replace if needed. If any are damaged, or if you have had significant air or oil leakage, buy a seal kit for the shock, and install those seals. Remove O-rings and rubber square cross-section seals (square seals or quad seals) from the shock body (piston) by squeezing and pushing them with your thumbs until a loop pops up that you can grab and roll off with your thumb. The backing rings surrounding the seal are split and will pull off easily. Dig the seals out of their grooves in the narrow end of the can with a sharpened pick of some sort. A couple of long nails you sharpened by spinning them in a drill against a belt sander will do fine; leave one straight, and bend the other one near the tip so that you have some options for digging the seals out of their grooves. Rather than going in under the edge of each seal with your tool, which could scratch the shock’s anodized coating and create an air leak, stab each rubber seal and Teflon backing ring with your sharp pick, and stretch the seal up over the lip of its groove and pull it out. Press the new O-rings, rubber square seals, glide rings, seal-backing rings, and so on back in place where the old ones were.
- Lubricate the seals. Wipe some Slick Honey grease on the piston seals and the seals in the end of the air can. Better yet, squeeze Fox Float Fluid from a 5mL blister pack on the seals, lay a bead of it on the shock body, and squirt the rest of it inside the can just before it meets the threads in step 8, below.
- Slide the air can back onto the shock body and, if you can, up against the threads. If you have the shock in a vise or can do so in your hands, screw it on (clockwise) hand tight. If you can’t get the air can screwed on, you will in step 10. Not being able to press the sleeve far enough to engage the threads is actually a good sign, indicating the seals are effective at building pressure behind the piston. Slip the travel-indicator O-ring onto the shock body.
- Install the shock in the bike. First grease the eyelets and reinstall the aluminum spacer/reducers or mounting sleeves and spacers (press them in with a vise if they won’t go in by hand alone). Replace any bolts, washers, and sleeves you removed.
- Sit on the saddle to compress the shock and screw the air can back on. Using the leverage of the bike to compress the shock is the most effective way to overcome the air pressure building behind the piston as the can slides on and get the threads on the can and shaft eyelet cup to meet up. While sitting on the saddle, grab the air can and screw it on clockwise, as if it were a jar screwing into its lid. Turn it by hand until it stops with the seam of the wraparound label lined up behind the shock.
- Inflate the shock to your desired air pressure.
- Slide the sag-indicator O-ring back against the can seal. You’re ready to ride another 40 hours!
Adapted from Zinn & the Art of Mountain Bike Maintenance, 6th edition, by Lennard Zinn, with permission of VeloPress.