Have a question for Lennard? Please email him at veloqna@comcast.net to be included in Technical FAQ.
Dear Lennard,
My Ultegra RX rear derailleur has developed resistance, or stiction, when rotating the cage forwards. The stiction is worse with the clutch on. It makes shifting to a larger cog harder. The same thing happened to my wife’s Deore SLX MTB derailleur, and my mechanic said it was kaput and needed replacing. I tried removing the cover and lubricating the shaft that the clutch spring grips, but this did not help. Is there a fix for this problem? Is this a common issue with Shimano clutch derailleurs?
— David
Dear David,
There are instructions detailing how to adjust a Shimano rear derailleur clutch in chapter five of the of Zinn and the Art of Road Bike Maintenance, 6th edition. Those instructions are limited to adjusting the clutch tension only and doesn’t cover lubrication, which requires special grease. However, here is a very thorough answer to your question from Shimano mountain bike product manager Nick Murdick that includes lubrication instructions.
― Lennard
It sounds like David was on the right track with adding grease, but it may have been the wrong kind or in the wrong place. With a few tips, we have a good chance of bringing his derailleur back to performing perfectly. Of course, it’s impossible to diagnose a bike without seeing it in person and this is no substitute for the work of a professional mechanic at the local bike shop. The previous derailleur that a mechanic recommended replacing may have had a very similar symptom with a more serious cause that wasn’t so easily remedied. That’s a possibility here too, but let’s assume it’s a simple fix for the enjoyment and education of your readers.
The clutch units on Shimano Shadow+ rear derailleurs have a regular service interval for adjustment and lubrication. The good news is that they can be serviced and it’s a relatively straightforward procedure that professional mechanics are very familiar with. After the first few hours of riding, the clutch will break in and the friction band will need to be tightened a little to bring it back to the original level. The thirty-day tune-up offered by many bike shops is the perfect time to take care of this. Some derailleurs have a small removable plug on the clutch housing so that the friction can be adjusted very easily, but for the Ultegra RX derailleur, the clutch cover would need to be removed to access the adjustment bolt. It only takes a small adjustment which can be checked with a torque wrench inserted into the derailleur’s P-axle on this model (others have a Torx cut-out on the back of the pulley cage). Simply tighten the friction band adjustment bolt until the friction is where you want it within our specified range. After the initial break-in period and adjustment, the derailleur shouldn’t change much and really just needs an annual inspection. Eventually, the special grease between the friction band and clutch unit will need to be replaced. This is likely the stage that David is at with his Ultegra RX derailleur since the primary symptom is that the cage will skip when it rotates forward instead of sliding smoothly, even with the clutch turned off.
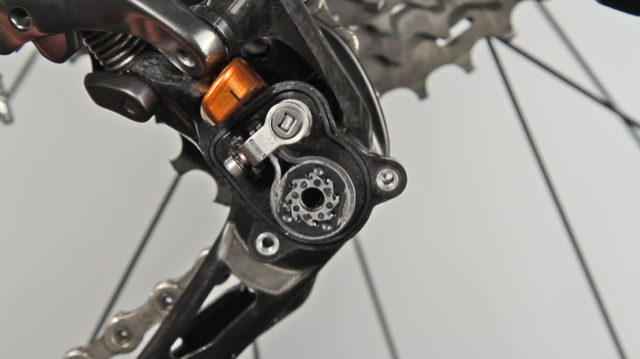
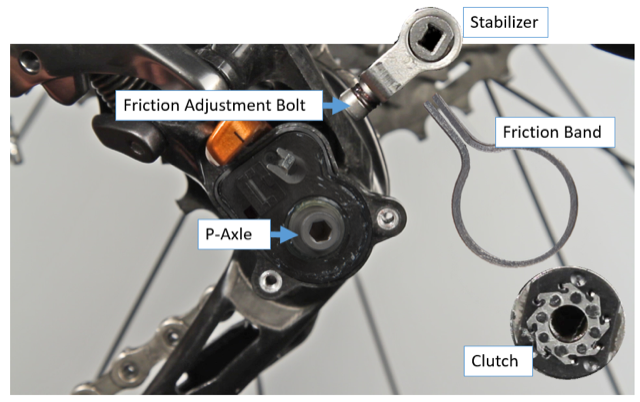
These two pictures show what is under the clutch cover and the names of the important pieces.


This mechanism is essentially a coaster brake, just like the ones found on beach cruisers. Inside the clutch is a one-way bearing that allows the pulley cage to spring back with no extra resistance but completely lock up and prevent forward rotation. The outside of the clutch is a brake shoe. In order for the pulley cage to move forward, this brake shoe needs to slide against the brake surface inside the friction band. A key thing to notice is that it takes a relatively high amount of force to get the cage to start moving forward but once the clutch breaks free from the friction band it will slide quite smoothly but with more friction until it stops. We can also see that the friction adjustment bolt controls how hard the friction band is clamped around the clutch and that turning the lever to the off position greatly reduces, but doesn’t fully eliminate, that clamping force. Since David is experiencing stiction when the cage rotates forward that is reduced but not eliminated when the clutch lever is off, it likely points to a problem with either lubrication or corrosion between the clutch and friction band.
There are three key things that have to be done in order to bring this derailleur back to life:
First, the inside of the clutch (and outside of the P-Axle) need to be dry. Any lubrication there can keep the one way bearing in the clutch from locking and preventing that free forward rotation.
Second, we need fresh and clean grease between the clutch and the friction band.
Third, we need to use a special grease designed to allow a brake to consistently grip but slide against a brake surface – that is – coaster brake grease. Shimano Nexus grease was our original specification for all Shadow+ clutches but a few years ago we added a new option with specific Shimano Shadow RD+ grease which is more durable. Both are acceptable now. Note that roller brake grease is different and shouldn’t be used. Other types of grease may remedy most of the problem, but they will keep the clutch from sticking to, breaking free from, and then sliding with the right amount of force against the friction band. Other greases will also wear out faster, leading to a more frequent need for service. Because the grease is specific to this job and because getting the clutch, friction band, and stabilizer apart and back together can be tricky, it is often best to leave the procedure to a pro mechanic at the local bike shop. It’s worth noting that I’ve had to leave out some key details, so this isn’t a good instruction manual on its own.
As a final note, I’ll point out that we have a dry interface between the steel one-way bearing and the P-Axle. That means that good sealing and keeping water out are key. We recommend avoiding a harsh stream of water pointed at the clutch unit when washing the bike – a good practice for all of the bearings on the bike.
If David’s wife’s derailleur needed to be replaced because the clutch was bad, it’s likely that corrosion was the root cause.
— Nick Murdick, Shimano mountain bike product manager
Lennard Zinn, our longtime technical writer, joined VeloNews in 1987. He is also a custom frame builder (www.zinncycles.com) and purveyor of non-custom huge bikes (bikeclydesdale.com), a former U.S. national team rider, co-author of “The Haywire Heart,” and author of many bicycle books including “Zinn and the Art of Road Bike Maintenance,” “DVD, as well as “Zinn and the Art of Triathlon Bikes” and “Zinn’s Cycling Primer: Maintenance Tips and Skill Building for Cyclists.” He holds a bachelor’s in physics from Colorado College.
Follow @lennardzinn on Twitter.