Published June 19, 2012 11:55AM
Technical FAQ: Bike fitting and weight distribution
Lennard Zinn answers reader questions on steerer tube height, saddle-to-bar drop, and weight distribution
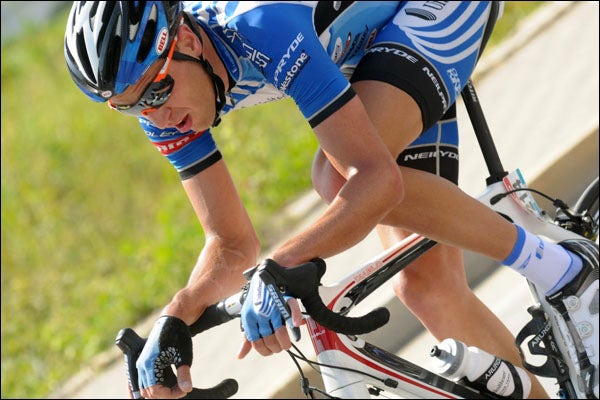
Having more weight over your front wheel provides more control while descending because you have more braking leverage. Photo: Brian Hodes/Veloimages
Editor’s Note: Lennard Zinn’s regular column is devoted to addressing readers’ technical questions about bikes, their care and how we as riders can use them as comfortably and efficiently as possible. Readers can send brief technical questions directly to Zinn.
Dear Lennard,
Long-time fan and regular reader here; my well-thumbed copy of “The Art of Road Bike Maintenance” has greasy pawprints on almost every page.
I’ve just acquired a Zipp Service Course SL stem which I intend to install on a carbon steerer (either an EC90SL or an AlphaQ GS10) with a Chris King threadless headset.
I’m used to cutting a steerer 3mm above the stem and using a 5mm spacer. However, Zipp’s supplied instructions state that I should cut a carbon steerer to be exactly flush with the top of the stem.
It seems to me that if I do this I will be unable to preload the headset, since the King top cap is flanged and will tighten onto the steerer not the stem. Should I ignore Zipp’s instruction and follow my usual method?
— Josh
Dear Josh,
Yes, you still need to put a spacer on top of the stem so that the King top cap flange will not bottom out. This is always my recommendation on cutting steering tubes—cut it slightly above flush with the top of the stem or the top of the top spacer, and then add one more 5mm spacer on top before installing the top cap.
Here is what Zipp Speed Weaponry’s Technical PR Manager David Ripley says about it:
“Basically what we recommend is what Rock Shox has recommended for years. Cut the steerer flush with the top of the stem body, and install the system with a 3-5mm spacer in between the stem and the top cap. RS learned over years that by allowing that movement to occur at the top, there was much less chance for occurrence of steerer tube breakage. Obviously this is much more of an issue in mtn biking than road biking. But hey, safer is better all the way around, right?”
ADVERTISEMENT
— Lennard
Dear Lennard,
It appears as though professional riders have a significant drop from the top of their saddle to most vertical part of their handlebar. Distance measured may not be the proper metric, and maybe weight distribution is a better gauge. I’ve heard 50 percent weight on both rear and front contact point, as well as 60/40 rear. I ask this because coming down steep switchbacks, if I don’t have enough weight on the front of the bike it appears less stable. Perhaps this is done simply for aerodynamics, or to ride a smaller bike that might be more stiff; however, I think it does help when descending relatively fast. Any thoughts appreciated.
— John
Dear John,
I’m convinced that people that suggest 50-50 weight distribution over the wheels, indeed even 60-40, especially with tall riders, never actually measured the weight distribution of a properly set up rider. I’ve measured this a lot, and with riders I’ve checked, there is always more than 60 percent of the weight on the rear wheel.
It’s easy enough to do: put a bathroom scale under one wheel and a wood block the same thickness as the scale under the other wheel. First, weigh yourself standing on the scale while lifting the bike off of the ground. Then sit on the bike perched on the scale and block and hold yourself up by touching an elbow against the wall. Have somebody else read off the scale reading. As a double check, turn the bike around so that the wheel on the scale and the wheel on the block are reversed, and take the measurement again.
ADVERTISEMENT
In any case, you’re right that you want sufficient weight on the front wheel to corner well on a descent, but on a steep one, that is seldom a problem, even with a high handlebar, because the hill pitch combined with your hard braking coming into a corner throws ever more weight to the front. At a minimum, more control is achieved by being in the drops when descending a curvaceous mountain road because you do have more weight down over the front wheel, and you have more braking leverage.
As for why pro riders do it, it’s almost always for improved aerodynamics. Sometimes this is misguided, as some riders would actually be more aerodynamic with a higher handlebar, as they could sit more comfortably with a flatter back. Lars Bak is a good example of this; when Andy Pruitt raised his bars, his Saxo Bank team director Bjarne Riis freaked until he saw the data showing he was actually more aerodynamic. But this is not widely understood, and director sportifs tend to want the bars of their domestiques very low, the rationale being that they’re going to be at the front of the pack pulling for hours on end, and they need aerodynamics to be on their side.
There are plenty of instances, however, where raising the handlebar of a climber has resulted in better results in the mountains. Andy Hampsten told me a number of stories of this on the 7-Eleven team, where he was a lone voice in the woods recommending his teammates raise their bars. Dag Otto Lauritzen took him up on it the day before stage 14 in the Pyrénées from Pau to Luz Ardiden at the 1987 Tour de France and won the mountainous stage! Hampsten always told me, “If you want to lift something heavy, would you rather lift it off of the floor or off of a table?”
— Lennard
Dear Lennard,
There have been a lot of recent tips from you guys on replicating bike position in the past few weeks, and lots of comments. I understand the stack and reach measurements, and how to use them to create the same contact point positions from bike to bike, especially the saddle in relation to the bottom bracket, regardless of frame geometry. I’d say it’s fair to assume that most folks have different handlebar positions on bikes intended for different riding — the lowest, most stretched out position on their road bike, possibly a slightly higher, shorter cockpit on the ’cross bike, and an even higher (possibly level with the saddle) bar on the cross-country or trail mountain bike.
So my question is, in your opinion, do you recommend the exact same saddle position on all bikes, regardless of relative bar reach and drop? It would seem to me that as the bars get higher and higher, and your torso becomes more vertical, that your center of mass would shift, and thus your weight distribution (and balance) between feet, butt, and hands would change. Would that necessitate small adjustments in saddle height or setback for the best balance point, or do you recommend just keeping the saddle at the same position, and adjusting weight distribution by changing stem angle and height as needed.
— Adam
Dear Adam,
When you get to more downhill riding on a mountain bike, you definitely use a totally different saddle position. But from road to track to cyclocross to cross-country mountain bike even to enduro or trail mountain bike riding, I generally recommend the same saddle height. The fore-aft position of the saddle, however, I do recommend changing for the particular discipline. An obvious circumstance where this changes is in time trials and triathlons. On mountain bikes with long travel, I also recommend a slightly more forward saddle position so that the rider doesn’t end up floundering way back on climbs when the suspension sags deeply into its rear travel, especially if the fork cannot be lowered for climbing like on a Fox TALAS or the like. On track bikes, the saddle position is generally more forward than on the road as well. Cyclocross bikes often end up being actually the same position as the road bike, including the bars.
— Lennard
Dear Lennard,
I had been looking for a scientific way to transfer over bike measurements between two bikes and came up with basically the same process you describe. After a kind motorist assassinated my Orbea road bike on the way to work last fall, I replaced it with a Giant TCX as I wanted to get into ’cross, and had two road bikes. The Giant frame basically measured spot on with my Look 585. But when I transferred over the measurements from the Look, something was still off — I felt stretched out on the bike. After verifying that my measurements were correct in terms of reach and stack locations, I figured out that the culprit was bar reach. The bars I had on the Giant had about 15mm more reach than those on the Look. I swapped the stem for one 10mm shorter to fix the problem, but is there a measurement in here I am missing, or does this method of measuring to the center of the handlebar not account for bar reach? It’s easy enough to account for since it’s just one measurement, but I thought it worth mentioning.
— Brian
Dear Brian,
Very good point. The transfer of dimensions using stack and reach to the center of the bar assumes the same bar dimensions. Without that, you would have to reach a compromise between your lever position and the position of the top of the bar.
— Lennard
Dear Lennard,
I was reading your stack and reach article, with all the readers’ comments on how to measure a bike. Have you ever seen this device from BiciSupport?
— Gary
Dear Lennard,
I was writing in response to the recent response you got about your stack and reach article. I found your initial article regarding matching the fit of two bikes intriguing and relevant to a project I was currently undergoing when trying to make my Cannondale Caffeine 29er and Specialized Epic, which has 26″ wheels, fit as closely as possible. The two bikes could possibly be the most different I can imagine considering the wheel and frame differences. There was one other difference I noted once starting the measurements. Following your diagram and instructions, I was able to get accurate measurements with one modification, which may just be a matter of how you interpret your diagram. My Epic has a riser handlebar and the 29er has a flat bar to make up for the increased front-end frame height of the 29″ frame. To compensate for this I took the measurement from floor to center of handlebar and the end of the bar vs. next to the stem for each of the bikes.
— Marty
Dear Marty,
Perfect method.
— Lennard